Adrawerable.

It’s been a crazy couple of months for Mrs. Hair Tonic & Horse Feathers & I. I’ll spare you the ghastly details but since October of 2011 we’ve lived in an apartment as our cute little house decided to bite the hands that have fed it. Major plumbing catastrophes. But alas, that’s not the point of this post. These drawer linings are:

A fancy drawer liner.

You’ll only see it when it’s really really time to do laundry.

A while ago, I came across a treasure trove of 1920’s-30’s era furniture that was just sitting outside a nearby neighbor’s house, waiting to be thrown away. This little dresser drawer was among those items. I decided that I wanted a put some drawer linings inside of them and I really wanted have fun with those. Now I know that not a single guest would likely every see these (and neither would I really) which makes it the equivalent of ironing your socks & underwear but oh well.

You can take a piece of foam core (or you could use cardboard but we wary of the corrugation as it might cause ripples) and cut it to the exact size of the bottom of your drawer. From there, using scrapbook paper, vintage wallpaper, computer printouts and whatever other ephemera you can find, you can let your artistic & collage-making sensibilities go wild and really create whatever you want here. I love checkerboard patterns & Victorian etchings so that’s what I did here. I found 4 different  kinds of scrapbook papers that I liked (two darkish, two lightish) and made the checkerboard, adhering it using Modge Podge. Then I found an image of a Victorian woman & a butterfly on the internet, printed those out and put them over the checker board. I also printed out a very small poem by Margaret Atwood and put that in there as well for fun and then Modge Podged over the whole thing.  A good resource for vintage ephemera and photographs & graphics to print out and use is The Graphics Fairy.

So that’s just ONE of the 5 or 6 drawers. Each one can be different, the same, themed, or-whatever. I’m going to make each one different but all with a Victorian whimsy flavor to them to tie them all together. If you try this, do send pictures as I’d love to see what you come up with!

PS ~ I don’t scrapbook but scrapbook paper is incredibly wonderful to have around. I have books and books of it and have used it countless times in so many projects, including this one. Whenever you see that a book of it is onsale, get it! Don’t waste money on individual sheets as you get a much better deal on the books.

Music : interrupted / Piano : repurposed ~ { Part III }

First of all, this is part III which obviously relate to part II and part I. If you’ve just stumbled onto this blog, it might interest you to check those out as well. Second of all, there will be a part IV to this. Though the armoire is standing and functional, there still is a bit to do yet aesthetic-wise. And also, this is not really a how-to so much as it is a this-is-what-I-did. I know that some people find this site via a Google search seeking how that might go about repurposing an old piano they may have. If you have any specific questions regarding how I did something, send me a note.

But in a nutshell, “it’s alive!

From Beyond. A Frankensteinian amalgamation: "The most merciful thing in the world, I think, is the inability of the human mind to correlate all its contents. We live on a placid island of ignorance in the midst of black seas of infinity, and it was not meant that we should voyage far. The sciences, each straining in its own direction, have hitherto harmed us little; but some day the piecing together of dissociated knowledge will open up such terrifying vistas of reality, and of our frightful position therein, that we shall either go mad from the revelation or flee from the light into the peace and safety of a new dark age." ~ HP Lovecraft

I’m working backwards here by showing the most finished picture before showing the ramp up to it. But I got excited. Can you blame me? Doesn’t this look fun? I’m so pleased that it turned out as well as it did. Vision is one thing but execution is everything. But I am getting ahead of myself. So you saw where it was last time; a hollow shell. Well there isn’t that much more to than that really.

Here's a look at her shelf guts before we sow her back up.

Once we sat the TV inside we realized we had a major problem. The screen, more or less fits inside the hole and most of the TV casing is covered. This is desirable, yes. However ~ this meant that the remote control sensor, which was right at the bottom center of the casing, was blocked. To get the remote to work I had to literally stand right in front of the television, hold the remote just inches away, aim it straight down at the television and hope that what ever magic rays that make remote controls work would squeeze themselves into the crevice and change a channel. What’s the point of a remote then, right?  You might’ve noticed the solution in the photo above but in case you didn’t:

Holey piano, Batman

A hole right in the center.  Now without too much difficulty at all, I can again change channels just like a modern man. The only drawback is I can’t be too far left or right of the hole to use the remote. If our particular TV had a plug in sensor like some do, we’d be in the pink. That would’ve been very helpful.  I will paint or stain the inside of the hole so it disappears somewhat ~ or perhaps cover it with an antique radio speaker cloth (like this) which would hide it yet would allow whatever necessary magic remote control rays to arrive to television. It may be a moot point as the hole basically disappears when the cover is up (see the first picture in this post).

As I mentioned, there will be a part IV to this as there’s still work I’d like to do to it. I want the television to be able to be 100% concealed whenever I want it to be so I will have to figure out how to put hinges back onto the music stand that is currently missing. Initially I was going to have it flip straight up but there are several reasons why that won’t work. Plan B is to split the piece down the center. Ideally I’d love to be able to have them close like this player piano‘s does but I think the shape of my piano simply prevents that from working. What I’ll likely end up doing, if the moulding on the edges permits, is turn the single music stand into 2 cabinet-esque doors I can open and close.

It’s been mentioned a few times by a few folks that I should do this as a business. That’s an interesting thought. This project was one of the biggest pains in the neck ever but in the end it worked. If you’ve got an old piano that you don’t play and you’d like to do something like this (or something else altogether), do drop me a note. You’ll find I can be quite awesome, but humble.

It must be said that I couldn’t have completed this project without the help of Kevin Garcia, whom I referenced in one of my very first Hair Tonic & Horse Feathers posts, as well as Mark Rosellini. Even more thanks goes to my wife for allowing this project to go on INDOORS for so long. Hopefully a nice piece of unique antique furniture to hide our ugly black & shiny modern devices will make up for the trouble .

Part IV coming soon.

Music : interrupted / Piano : repurposed ~ { Part II }

It’s been a while since I’ve posted but that’s not stopped my regular influx of people who come to this site to find one of two things: information about vintage ice boxes and/or 1930’s european haircuts. If you want to make a website with guaranteed traffic, make one about those things.

So I’m returning to post a little bit of the progress for my piano repurposing that I wrote about here a few months ago. I’ve got a hard deadline of July 30th to finish this up and get it home-ready so I’m burning the 9:30 oil to get it done. I’m too old and what with work in the morning, to burn the midnight oil. I’m still aiming to make it an armoire for our flat-screen Netflix machine (our television) and though the hardest parts are finished, I’m left with the parts that required a little bit of know-how and that’s a lot of what I don’t have when it comes to construction.

Out of body experience.

As you might be able to figure out from the photo above (and the photos in part I ), I was able to get the harp of the piano out and sort of reconstruct the shell of the piano. You can see it there at the bottom of that picture. THE hardest part of all of this has been trying to remove the harp from the wood it’s connected to. The 88 tuning pegs that held those high tension strings are no surprisingly anchored into the wood. It’s like they didn’t want them to move. Ever. I’ve tried removing them one by one as if they were a bolt but aside from not having the right tools, those things do not want to budge. Plan B. 

Macabre! Macabre! Macabre!

Even that has been too insanely heavy to move by myself. Since I’ve been doing this all by myself I’ve not had any help thus far, it’s just been laying on the floor where it landed for a few months until I’ve been able to get to it. To get some of the wood off of it and make it light enough to at least scoot I’ve had to literally beat it with a sledgehammer and a dull axe that’s about as old as the piano. I am beating only the wood (if I can help it) and am trying to salvage the harp so I can repurpose that too once I’m finished with this project. 

Behind the Strings: Pay no attention to the man behind the curtain

With the help of a friend I’ve actually made the piano about 3 or 4 inches shallower (though it had gotten too dark at the time for me to take pictures of it’s post-op state). Our home & living room is small enough to be measured in square inches rather than square feet so space is definitely an issue. As a remedy, Jen & Pat, two the lovely ladies at Aubergine Emporium suggested that we cut the piano to save a few inches. It was a brilliant idea as the television was a flat screen, we didn’t need all of that room inside the piano. As an added bonus, it’s just that much lighter too – and it needed the diet. Even though all the really heavy parts are out of the piano, it’s still a beast to move.

So that is where we are at the moment. The shell of an upright piano with a slimmer figure and it’s organs have almost all been harvested. The next step is to build a shelf sturdy enough for the television and strengthen the whole structure a bit from the back. Without all the inside supports, it kind of does a hula-dance if you push against it. Not something I’d like to set an expensive piece (yet ugly) of technology on quite yet. Part III and hopefully a finished product coming very soon.

Oh yeah, and wheels. A nice set of new casters are in order.

Music : interrupted / Piano : repurposed ~ { Part I }

You may’ve read about my piano stool rescue a few of a months ago. I rescued that piano stool from 100+ of time that’d split the wood and corroded the metal. That turned out lovely enough but according to my 100-year-old piano, I’m a bigger enemy than time ever was. See, I have {had} a 100-year-old piano that I procured about 10 years ago. I loved that piano. It was my elan vital. I wrote many songs on that piano. That piano followed me when I got married and moved an hour away from home. When it came to live at my new house it was even prominently featured in the kitchen. Long story short, it didn’t last long here. Faced with having to do some heavy-duty construction at the house last year , I was forced to move it into another room and it was then that gravity & I ganged up on this lovely antique piano and ~ I’m sure you can anticipate where this is going~ I’m just fortunate that I was able to get most of myself out of the way as all 500+ pounds of it came crashing down with the most amazing sound I’ve ever heard and rendered the piano unplayable. There’s nothing like hearing a piano crash onto the floor.  Sotto Voce: Don’t invite me to a piano moving party as this is the second piano that I’ve had a hand in dropping. I’m 2 for 2.

Long winded explanation to say that I busted up my one and only piano and didn’t have the heart to throw it away. But what to do with a quarter ton piano in the middle of a room?

Taking out the piano's 'guts' and will reassemble the 'bones'. I removed every part that I possibly could to lighten the weight.

Taking the piano's harp (not pictured) out was by far the most difficult part but it contributed the biggest 'weight loss'. I wanted to remove the harp from the chassis but I simply could not get it to budge so I took the whole part out. The biggest casualty was the wall that I gouged when I dropped that piece. In my estimation it's got to be at the very least, 300 lbs.

I harvested some of the piano's vital organs.

More harvested vitals: I decided to use the pedals and instead made some interesting home decor out of them. We tore down our well-worn fence a short time ago so I decided to attach the pedal to a piece of the old fence, use a piano string as a hanger and, wah-lah. I'll be blogging about this project too ~~~ eventually

Putting the bones back together. I was going to get rid of the keys and have the lid permanently closed but I realized that that's where all the drama is! The contrast of those 88 black and white keys. I cleaned them up and put them back in and screwed them in as such that they're permanently fixed in the playable position.

Under the hood: Not too much! I decided that I would turn this into a armoire for our television so we can hide it when it's not being watched. I hinged the bottom portion so it can be used as a cupboard/storage area. I'll be building some shelves that will fit nicely into that large bottom space. It can be used to store/hide a DVD player, video game consoles, DVD's, etc... This is plan A. If Plan B doesn't work out then my plan is to turn it into a bookshelf. What do you think it'll work best as? I do have a plan C actually. I thought if I can't make all of this repurposing work out, I would make it a garden feature. I think it'd be so fun set it in the backyard to grow flowers all around it and in it, letting vines creep around it's legs. It could be really magical! Part of me hopes that plan A & B don't work out as I think it'd be stunning in a garden.

Here's the cabinet I've built to go underneath the keyboard. As mentioned above I put hingest on the bottom piece of wood so it acts as a door to hide everything underneath. The wood is all leftover scraps from a fence we built last year that've just been sitting there, begging to be used. If anything ignites my creativity, I will not throw it away (sorry about that Mrs. Hair Tonic & Horse Feathers). I've inherited that lovely trait/liability from my father, Mr. Hair Tonic & Horse Feathers Sr.

So that’s where I am at this very moment. So far 100% of the materials I’ve used for this project have been things I’ve already had and I’ve spent all of $0. Also, I’ve cut all the pieces with a handsaw, not a skill saw. I’ve come to REALLY appreciate every cut that’s gone into this because of it. I may’ve gained a muscle or two in the process.

Part II will be coming soon as I try to hone my not-so-handymanly skills and get a television into that old box. I do love the past but for a project like this: thank goodness for flat screens. Stay tuned!

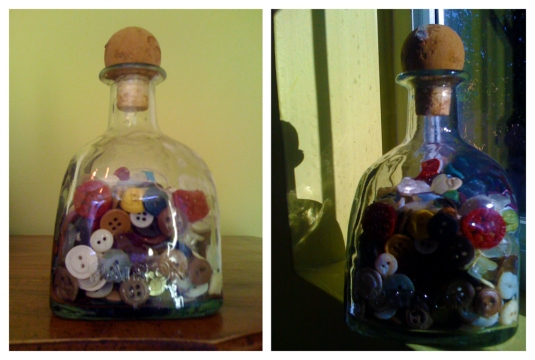
ideas are free #02: Bottle~o~Buttons

~{ I’m sure that Anthropolgie stole it from somewhere too }~

I can’t lay claim to this idea because I saw it a while ago at Anthropologie. A smaller, less unique looking bottle full of antique buttons for $16.

I liked the idea but I didn’t care for the price however. In fact I don’t think I like any of Anthro’s prices but I digress.

I made this bottle for my favorite price: $0

I now have a unique item that is currently sitting on my coffee table at home. From a discarded bottle of Patron and a bin of old buttons I happened to have, I recreated the Anthropologie look and you can too!

You might not happen to have an assortment of old buttons at your disposal you might be able to procure some at a thrift store or a yard sale for just pennies. Bottles and jars are pretty easy to come by. The jar I used isn’t even old, it’s just neat looking with a fun cork. An old apothecary bottle or even a mason jar that would do quite nicely as well.

And why stop at buttons? Fill it full of something else unique that you might have ~ antique keys, dice, old fish hooks, bow ties, toy soldiers, origami swans, etc. If you try it out, take a picture and send it to me and I’ll put it here!

Civil War Silhouette of the Great Emancipator

I had a few hours to kill this morning as I wasn’t able to participate in this year’s Record Store Day so to make up for it, I decided to create something.

Since I’m a Presidential history buff and since April 12th, 2011 marked  the 150th anniversary of the Civil War, I decided to honor The Great Emancipator with a great silhouette. I made my first painted silhouette last week and loved it so much that I couldn’t wait to get started on another one. I’ve been antsy.

a silhouette of the great emancipator in our humble orange quarters


Authentic Victorian silhouettes are cut out from paper so having a painted one isn’t much on authenticity but it’s very easy to do and the effect is great and instantly hangable. The Abraham Lincoln one took less than an hour to do and it looks great.  Although this one has a big too much negative space so I just might take it off it’s stretcher bars are put it onto 8×10 bars instead.

I took pictures of the process but I don’t think I’ll put them up. I do promise a tutorial but I’m waiting for my wife to do one as I want to walk through it with someone who’s never done it before so I can adequately explain the process.

Ideas are Free. Take this one.

I have an affinity for teeny tiny delicate things so the small purple flowers blossoming on some weeds in our front lawn caught my attention. I thought I’d snip a small sprig (and a single flower from our accidental Bougainvillea) and give a weed a new identity by having it decorate our bathroom…our teeny tiny bathroom (though it’s blossoms fell before I decided to snap a picture).

For vases I used the glass lids of some vintage oil & vinegar bottles my wife got at an antique store a while back for use as a bathroom decorations (the bottles themselves are seen in the photo above on the left and right sides). She had the clever idea to use the bottles as oil vases to put scented oil sticks in. To enhance our bathroom enhances , my wife found oil sticks with pretty decorative flowers on the end of them which you can sort of almost see at the top right corner.

Does this idea work for your space? Do you have some throwaway flowers and an eensy vase? Try it, photograph it, and send it my way and I’ll post it here.